Wednesday, May 22, 2013

Forest Mobile {side note: We bought a house!}

So... WE BOUGHT A HOUSE!  It's made me a little MIA this last month but I am going to be clogging up your blog feed after we start decorating, so really I'm just giving you a breather so you can be prepared for the awesome-ness!  Our house is a blank canvas with all white walls so first order of business is painting!  I may or may not have style boards and paint swatches already being narrowed down (because... well, it's me;).  Also, I've lived with white walls renting for far too long and now it's time for some color baby!

That being said, I made this mobile for the nursery, can you guess what the overall feel will be?


I want to make it very unisex so I am going to have a woodsy and very neutral color scheme with some girly accessories for miss June while she's in there;)


I made this using this tutorial and inspiration from this fantastic mobile here.


Pretty cute, huh?  I think so, and so does June;)


Wednesday, March 20, 2013

It’s like I had a baby or something...


I have to admit for the last little while every time I would think about blogging my initial reaction to the thought would be that maybe I should just give it up entirely.  But lately I have been thinking about why I have this blog.  I love sharing about my projects in style and décor.  I need an outlet so I am officially back and more determined than ever to keep up with this, because darn it, it’s fun! 

It’s fitting that I share with you all the projects I’ve been doing to keep my sanity with a newborn, poor weather, and life’s many changes as of late.  First up our master bed:


I did this while my husband was on one of his business trips, the sheets are amazingly comfy as is the comforter, my goal with this was to make it as comfortable as it was beautiful and I think I achieved it.  Then, because we don’t have a headboard yet I did these two canvas’ to anchor the bed.  The writing is a couple verses from our song (“Such Great Heights” by Iron and Wine”).  I hand painted it and it’s imperfection gives it a perfect look!  Our room is a work in progress with furniture, my husband has plans to make our side tables and drawers this summer but until then at least the bed is a hit;)

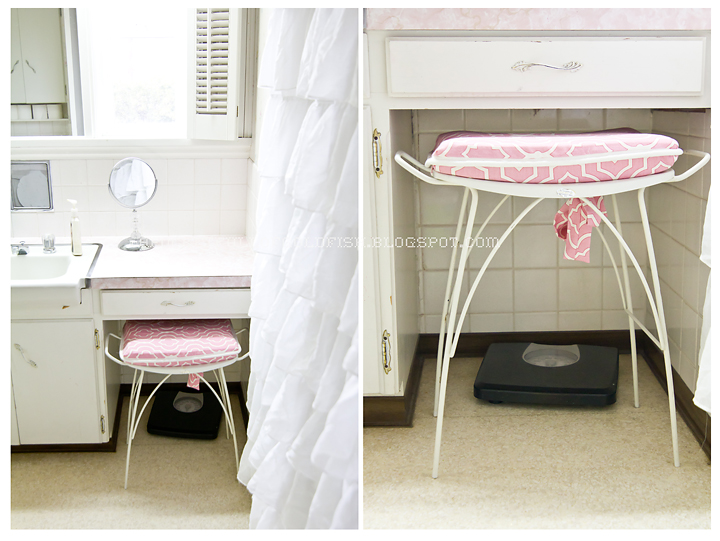
I made a little pad for my vanity chair:


Next, Lucy’s reading nook!  I found this magazine rack at TJ Max.  It had the ugliest finish on it, like they were trying to achive a pho rusting and it ended up looking like a sloppy cheeta print.  So I sprayed it white, hung it by the bed and filled it with her favorite books.  Then I took some huge throw pillows we used to use on our futon (back in our not so long ago school days) and made these slip covers:

I figured since they’ll be used to sit on I should make them removable for cleaning.  The other pillows are some extras I had from what came with our couch and one I found at Ross not to long ago.  Then, because my beef with pillows on a wood floor is that they always slip everywhere I bought a rubber mat, usually used for stabilizing rugs and put it in the corner (3 bucks at Ross, that’s the place to buy them!) 

I already had the ballon and clouds up there and I think they provide the perfect accessory for this whimsical area (plus baby sis loves to come read with us because she can stare at the clouds endlessly;).

Last, and not least is Lucy’s quite book-mini.  I noticed that her other quiet book, though awesome, is not quite pocket sized enough for church.  So I made this one, it seriously took me a day, which in mom time means very little time between keeping kids alive and happy.  It was a lot of fun, I loved coming up with the pages and (Bonus) I didn’t spend a cent on this thing since it was entirely made from scraps in my fabric and crafting supply. 


So now that I am caught up don’t expect me to disappear for another five months, I’ve got things to say and projects to brag about share with ya’ll.  Be excited…

Monday, November 12, 2012

The "Gus Gus Effect"


My sister calls this “the Smee”, but you get the picture.  I am getting to the attractive point in my pregnancy where I look like I should be demanding another beer from the couch;).  I am incredibly grateful that this time around my baby has dropped earlier.  This has provided me with my lungs again! On the other hand it has an effect that I didn’t have to deal with previously:  The low gut trying to make an appearance, as my shirt rolls it’s way up around the house for my daughter to point and laugh at (okay, maybe that’s in my head, but I wouldn’t blame her).  Don't worry, when I go out I make sure to wear my maternity pants and longer shirts. I’m not THAT pregnant woman…yet.   

But Ashley, why aren’t you just wearing larger shirts?  That’s a good question, and one that I would not have to answer if I kept on my laundry but, hey, I’m human too!  So what is my point?  I don’t really know except that I had to point out this funny part of pregnancy that isn’t always discussed in the higher circles of society.  Maybe to seek confirmation that I’m not alone in this disgusting world of the dipping tummy?   

Now, to show you that I haven’t completely given up on looking human, though I may not always feel it lately, here is some “dressing the ego” fun:


I got this sweater a million years ago at Ross because I loved the collar on it.  Unfortunately when I would wear it back in those days it made me look pregnant, enter a solution: I wear it while I’m pregnant!  I’m 35 weeks right now so I need all the volume I can get. This shirt provides!  


{Sweater: Ross $10, Shirt: Old Navy $12, Pants: Motherhood $35, Shoes: Minnetonka $55, Necklace: Urban Outfitters $gift, Snow: a cruel joke, it's only November!}


Thursday, November 8, 2012

Nursery Expo

Lucy's room is my playground for decorating.  Anything I think of doing I do, no filter necessary.  Sometimes this can get to looking a little strange but there is nothing I'm not willing to try in there so it yields some pretty surprises as well.  The trouble is that we are still renting so I am limited in what I can do.  Also, we will have her baby sister moving in there in a few short months so some of the arrangements will have to change.  Lastly, Lucy's room doubles as her toy room so not everything is to my aesthetic taste.  I am definitely excited for the day we are in our own place, but waiting until we can afford exactly what we want is definitely worth it right now.

Lucy's room is always a work in progress, there is so much going on that I need to consolidate and many things I want to add, but for now, here it is in all it's eclectic shabby chic glory!


The God Father's tactics would have had no effect on Lucy, she prefers to sleep with this horse head by her pillow.  It's actually her stick horse that she insists on sleeping with so he is constantly stuck between the dresser and her bed, otherwise she would bring the whole toy in if I let her.

The bedding set was from BJ's grandmother, it is my favorite, it was homemade by someone in his grandparent's senior's community and she won it in a raffle for charity.  I bought most of the artwork from thrift stores and real estate sales. The cute one bellow with the mommy pushing the buggy was one I picked up from an antique store in Oregon.  The coo coo clock is from Leavenworth,  WA (cutest little German town)


love needlepoint!


Some important pictures to include, especially a photo of Christ.  I picked this one out for Lucy because the little girl reminds me of her. 


This adorable chair was a Ross acquisition  I picked up the pillow from a place called Real Deals, one of my favorite decor stores that has locations in both my home town and here.

I still need to make a cover for the changing pad seen here, the one I had for Lucy is officially shot.  I have the fabric (a nice flannel, I find that's most comfortable for baby), now it's just about getting around to making it since this little guy is about to get used again and not just as a toy holder.  


I made this little clip holder out of chicken wire (which I spray painted pink), then glued into a frame from Hobby Lobby, so useful!


This shelf was a thrift find and just goes to show that you never know the full potential of an item.  It started off green with red apples.  I thought I could pop the apples off and fill the indent with whatever I wanted.  When I discovered I couldn't pop them off because they were carved in I covered them in scrapbook paper, aging the edges and it tuned out prettier then I could have imagined it would.  


This wall with the covered shelf is a bit of a place holder until June's crib goes in, that's why I've left the wall alone for now.  


I had some fun with it though, it's a little whimsical with the bird's nest in the covered pie plate (another thrift).  

The curtain is to hide Lucy's books and some of her bigger and bulkier toys


This balloon was a treasure find while thrifting (it wasn't marked and they gave it to me for a dollar!) I made the clouds from crafting foam with jigsaw slices, one in the bottom the other in the top to keep them locked.  Then I just used a crotchet, skinny yarn for the string.  I thought about doing clear fishing wire but I like the more whimsical look this gives. 


The mirror on the dresser is from my room growing up, not sure how many siblings it went through before that but it ended with me and I've always loved it.  The books are Eloiese Wilkins, I love her books and collect them for Lucy.  This sweet 3-D framed girl was another thrift (I'm seeing a pattern here;)  Lucy's dresser was five dollars at a yard sale, I replaced the top two drawer pulls with these jeweled pink ones from Joann's just to give it more interest.


I love this toy box that I purchased from a yardsale this summer.  In her closet I have one of my props turned storage container for shoes.


Ah yes, it's still her toy room, I have to be reminded of that;P The lovely painting is an original my parents bought me in Victoria B.C. when I was sixteen, I love it, and it goes well with her room, sweet and light.


Two Shel Silverstien poems that I took out and framed for Lucy's room.  I love his poems and his crude artwork.


While I was taking photos Lucy came in and had to remind me that this is her space by putting toys all over anything I was taking photos of;)  Here she is giving me her snotty face that she does when she knows I'm taking photos of her, such a pouty model sometimes;P


Peace out Amigos!


Monday, October 15, 2012

Flaunt the Bump

I know this is a blog post that spans about two decades of change in dressing pregnant women, so the message might seem a bit overdone. Regardless, It still comes up with me so I thought I would address it. 


It still shocks my mom how I dress my tummy.  Mainly that I don’t swath it in drapey layers and patterns to try and hide my shocking condition;).  But what other time in your life can you celebrate weight gain with such flourish?  I find that on the days I don’t flaunt it I get strange looks from people, like they are trying to figure out exactly what’s going on with me.  The old “fat or pregnant?” question flashes across their expressions and it’s just awkward for everyone.  So instead of letting the people around me suffer I make it pretty apparent what’s going on with me, tight tops, high waists, hands on top of tummy, the whole shebang.  I am just a kind person that way;)

There are several ways to flaunt the bump:

Tightly swathed:
This can be done with a dress or tighter shirt, you can layer on top but as long as the tummy stays apparent it still gives the look that you want.

High Waist:
This can be accomplished in a shirt or a skirt, just as long as you keep either your legs or your top portion looking small with tight sleeves or pants.


Here I kind of did a combination, a tight maxi dress with a crop top that I made sure to tie a bit so it didn't undo all of my work of showing off the belly.  Just a fun combo for fall, I am loving the colors going on right now!


{Shirt: F21 $10, Dress: Gap $30, Necklace: Apricot Lane Boutique $15, Shoes: Minnetonka $50}

Monday, October 8, 2012

Ultimate Quiet Book...


After seeing so many amazing "quiet books" on the wonderful world of Pintrest and seeing the amazing job my sister in law did making one for my daughter I was inspired to try my hand at the craft.  I drew from a few different resources, but my main muse was this adorable clothing fastenings quiet book from "Forty-two Roads".  It appealed to me mainly because I don't know how to put in a zipper yet (I know, I'm lame) but I thought, "what better way to cheat having to put in my own fastenings then to take apart old clothing?".

I had a lot of fun doing this, it didn't actually take me too long either.  Maybe a couple of obsessed sewing days;). I lined each page with fleece that I had left over from a car-seat cover I made for Lucy a million years ago.  All the pages were out of random scrap fabric I had lying around.   I cut them out using a 12 x12 scrapbook piece of paper as a pattern.  I also used some felt I already had (who doesn't just have tons of that lying around?  I always do)  The only thing I had to purchase for this book was some velcro for the fastening around the book and the number buttons as well as some iron-ons and a few pieces of thrifted baby clothing.  The total cost came to about eight dollars!  Not too shabby!