Thursday, April 10, 2014

I Looked in the Playroom and What did I See?

"I looked out the window and what did I see?
Popcorn popping on the apricot tree
Spring has brought me such a nice surprise
Popcorn popping right before my eyes
I can take an armful and make a treat
A popcorn ball that would smell so sweet
It wasn't really so, but it seemed to be
Popcorn popping on the apricot tree"


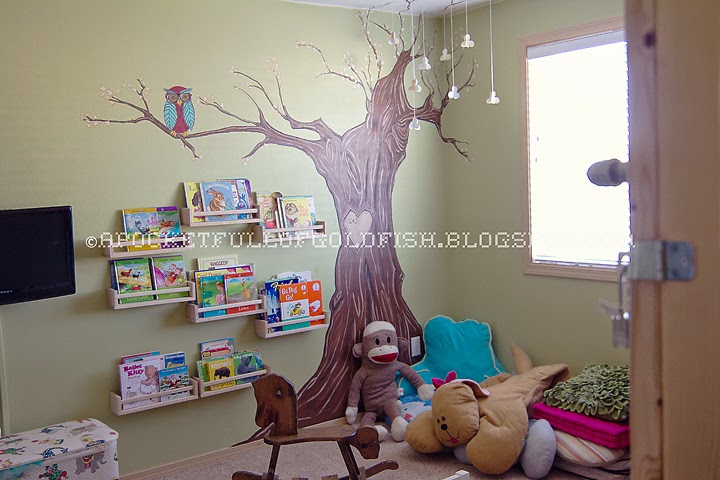
If you don't know this song of my youth, there you go;)  I have always wanted a "popcorn tree" for the playroom because it's Lucy's all time favorite song and just the amount of whimsy that I love.  Growing up my mom let my brother do a few paintings on our walls to encourage his artistic talents.  There were some amazing and very freaky looking dragons as well as an awesome "Nerd's Surfer".  My mom also did an ABC mural in my room so now you know where my propensity for painting on my walls comes from.  


When I started this project I enlisted the help of a friend of mine, Chelsea Duerden, who is an amazing artist.  She drew out the draft for the tree for me to go off of.  I love it, she gave it so much character and movement.  Then I waited until my mom came up for a visit and conned her enlisted her help;).  Together we created what you see, though I think the joke was on me in the end as I noticed her lounging, watching "Project Runway" while I painted all the little kernels (hence the reason there aren't a ton of them;), foiled!  The Owl was an added piece of fun, I couldn't help myself! Of course the letters for June and Lucy (with plenty of room for additions;).


There are still some things that I need to get done in here, like filling and painting out our amazing Murphy bed.   I would like to do some chalkboard in the bottom two spaces, but that's a project for another day, it's good to procrastinate save myself projects like that sometimes.  


The Reading corner "under" the tree is the perfect spot for curling up with a book, taking a nap or wrestiling with your sister (the last was a unintentional side effect but I'll take it, at least it's padded;).  Some "pillow pets made by my husband's mom grace that area as well as an owl poof and of course no corner would be complete without the corner pillow.  


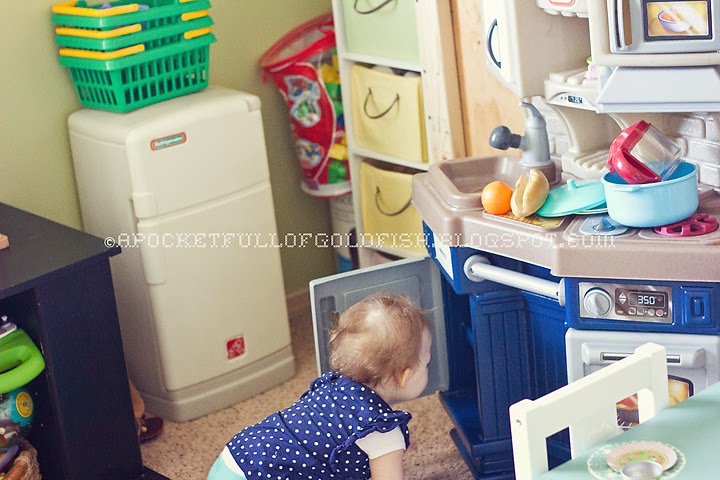
The girls love the playroom.  We've managed to fit a lot in there due to some space management with ikea spice rack book shelves, keeping the books flush and also presenting them to the kids so that they are more likely to pick one up and read.  We have the mounted tv that can swivel to face the reading corner for quiet times or fun movie parties with a friend or two.  The components are safely up in the top of the closet.  With the murphy bed we also have the potential for an even bigger movie party.  I had the bed mounted horizontally so that it could work as a sort of couch when pillows are placed at the back against the wall.  


We love it!

Thursday, December 5, 2013

Lyric Wall and the Master Retreat...


So, when we were searching for our new house one of my biggest "must haves" was a master suite that was a true retreat.  I love our master!  It is very large, has a lovely on-suite with jetted tub and walk in shower with a walk in closet.  One of the things I love most is the vaulted ceiling and I wanted to celebrate it.  That's when I thought about doing the lyrics to our song "Such Great Heights" by Iron and Wine.  Originally we had it on Canvas' behind our bed but in the large space they looked to tiny, enter the lyric wall...


First, I used a projector to get the lyrics up on the wall and penciled them in. 


Then I came in with a paint brush and filled it in.  It took about four hours but was totally worth it!


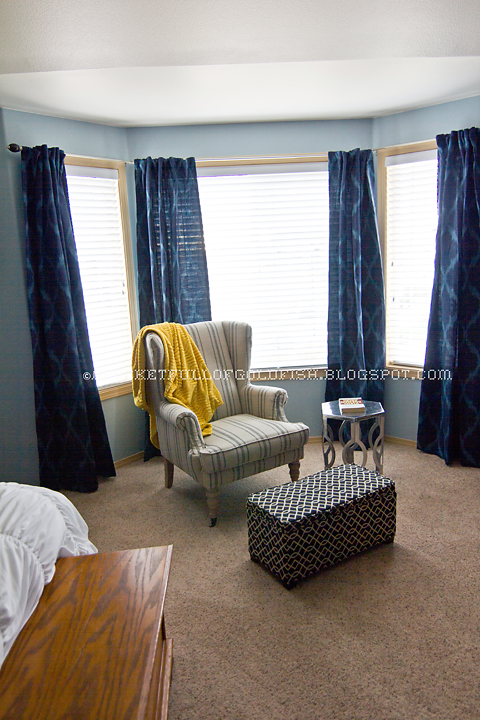
Because the walk-in closet is off of the bathroom and it's spacious enough to keep all of our clothing in, the bedroom was feeling a little too empty so we found a great purpose for the rest of the room: Office/ Library.  Since the house doesn't have a space for one it was a great use for the space and provides the perfect retreat for reading and studying in peace.  Hence the reading corner in the bay window:


Someday a coordinating chair more of the Mr's style will keep this baby company.


I wasn't too happy that the lyric wall wasn't the one you could see looking into the room because of the placement of the on-suite door and plugins but the large mirror I placed on the opposite wall makes sure the lyrics are still visible as you walk into the room.


 We love it!


Monday, September 30, 2013

Geometric Birch Tree Tutorial


If I had to define my style it would be an endless list that I can only sum up as "eclectic". Two general things I love are organic and modern.  In other words I love a natural feel without having everything to swirly and soft, I like clean lines and texture.  This is why when I wanted Birch trees on the nursery wall I had a hard time deciding how to do it so it wouldn't look too childish.  Did I project it onto the wall and paint it out?  Oh wait, I don't have a projector... Did I pay 200 plus dollars for vinyl?  Did I eye ball it and try to go more realistic and soft then I wanted? Yeah, it was rough.

After deliberations between my artistic and realist side I came up with this process using painters tape!  It gave me a very angular, geometric cluster of birch trees and I loved it.   Loved it so much I decided to do it in a more prominent place in our house: the vaulted stairwell!

As I've said before, we bought a newer, builder grade home.  That doesn't mean that it doesn't have some architectural features that I love.  One of the things that struck me when we looked at the home was the stairwell that greets you on your right when you first enter.  It used to be super ugly:


But I saw it's potential.  Behind the light fixture that was too small and um...dated (ugly) and the sad, saggy tension rod holding an ugly curtain (not pictured), was a beauty waiting to be unvailed.  I loved the open feeling with the bright, white spindles, high ceiling and natural light coming in.


Wanting to play up it's awesome features I decided that a couple tall trees at the landing would be perfect. Here's how I did it:

Deciding first how tall I wanted the trees and about what diameter, I laid out my painters tape.  Yeah that simple.  The great thing about tape is that you can move it, start over and it doesn't matter.  One thing to remember is that trees are not straight, especially birch trees so keep your tape going at subtle angles and make them change directions every couple of feet so it doesn't lean all the way to one side when your done.  Try to end close to straight up from where you began but don't have a straight tree the entire way up.  Get it?   Good:)

Then you need to add in your lines and knots.  Take your tape in three inch cuts and tear it in smaller strips.  Let the tape tell you what shape and length it wants to be then put it at various parts of the tree.  A tip is to put clusters of lines where you change the angle of the tree to make it look more natural and make sure its distributed pretty evenly between both sides of the tree.  Add some in the middle as well.  For your knots tear out a shape much like an isosceles trapezoid and put it at a place you want to draw the eye.

After you are done, take a step back and observe your work, looks pretty crazy?  Good.


Then, using a foam roller (I like to use foam because it gives it a more flat texture, bringing it out form the wall) paint your trees, completely covering all your detail pieces.  Give it at least two coats so it has definition and presence (we aren't 90's sponge painting this;).


When the paint is still semi-tacky carefully remove your tape.  Come in with a small, angled brush for any tiny branches you would like or to clean up any mishaps and your done!


It's that easy and can be done with any shape of tree you would like, I like mine to have some girth and funkiness to them but you may like more streamline, the beauty of this is that it's easy to adjust for your individual taste!  So have fun with it!

Now for finishing up my stairwell:

The stairwell has some of the only white walls left in the house, mainly because I wanted to make a gallery wall and white makes art pop.   My art is photography so I wanted to show off my work and my little girls all in one swipe.


The trees are the color from the living room which is a warm, soft grey color.  I love how it almost looks like a shadow, especially in the evenings.


The light fixture I chose because it brings in that eclectic look that I love and incorporated a lot of my design from the rest of the house which is a casual vintage feeling.    Putting that light fixture up was a feat!  It is about 18 feet off the ground and between the stairs and the ground so getting a ladder up there was difficult.  We had to get an extender that was able to go out 17 feet.  Then we leaned it against the stairs.  I changed the light fixture while my husband held the ladder for extra support (you know, so I didn't fall to my death, nbd).  Then I changed my first ever light fixture...one handed....17 feet off the ground, it was crazy but that's how much I hated that old fixture!


Some day I would love to stain the wood on the banisters a dark walnut but that is a couple of years away when we change over and update all of our trim and doors to white so it all flows nicely.  But for now it is done!  And I love it!

Friday, September 27, 2013

Woodland Nursery Love!

Our house was one big white box when we moved in.  After living in rentals for the last decade of my life I am done with white walls and not being able to paint.  When we moved in I kind of threw up a bunch of basic design for each room (paint, furniture, maybe a couple pictures).  Now that everything is  far from white, I am making my way through each room and defining it's style.  The nursery is the only room close to done (there's still a couple things I would like to do: upholstered rocker before we have another baby, painting some furniture, but nothing too pressing).


I wanted to keep the nursery very neutral so that we can move a boy in there (if that ever happens) with only minor changes to linens.  Honestly, when Lucy was born I wanted very neutral bedding but everything I got was pink (and who was I to be picky about it?!) I picked a very soft and creamy beige called "sienna dust" for the walls.  It is so perfect for that light and airy feeling I wanted.  It also gives a beautiful contrast to my cream colored birch trees...


Wondering how I did the trees on the walls?  This next week I'll be posting a tutorial so stay "tuned"!


If I had to sum up this room in one word it would be precious.

Friday, September 13, 2013

Function over Form


When we were looking for a house there were two things I was battling over with myself, did I want more function or form?  We realized early on in our hunt that with our price range and in order to stay in a good neighborhood, we would have give up one or the other.  As much as it hurt me with my artistic senses to do it, I gave up on form.  The beautiful hundred-year-old homes would have to wait until we had enough money to bring our open flow and modern conveniences to them.  

We actually got really lucky and found a beautiful newer home with the open flow that we needed and all of our other checklist items.  It may be a doppelgänger for most of the houses in our neighborhood and builder grade but it meets our needs beautifully! I am so happy with the choice we made. 


The fixtures are good enough to live with, but they aren’t too good that I feel bad replacing them as we see fit.  We’ve set many updating goals for the next few years but it’s nice that we don’t have to feel rushed to do it because everything still looks and works nicely in the meantime. 

The house is also a great fit for our growing family.   It won’t be outgrown easily and should hold us comfortably for at least the next ten years if not more!


I feel extremely fortunate that we were able to get both form and function in our new home.  Anytime I see a beautiful turn of the 20th century home I just have to remind myself that had we gone with one it would have had a choppy layout and oppressively pressing updates to be done, not a good fit for our family. 

Sitting in our home last night felt amazing!  It feels like a functional and beautiful home.  Not just a house, a Home.  Even with most of the dĂ©cor still in “style-board form” ;)  I admit that I've gotten a little lazy in my blog updates (instagram is evil!)  This week though I am going to start posting projects and rooms as they're completed so be excited and stay "tuned"!;)


Wednesday, May 22, 2013

Forest Mobile {side note: We bought a house!}

So... WE BOUGHT A HOUSE!  It's made me a little MIA this last month but I am going to be clogging up your blog feed after we start decorating, so really I'm just giving you a breather so you can be prepared for the awesome-ness!  Our house is a blank canvas with all white walls so first order of business is painting!  I may or may not have style boards and paint swatches already being narrowed down (because... well, it's me;).  Also, I've lived with white walls renting for far too long and now it's time for some color baby!

That being said, I made this mobile for the nursery, can you guess what the overall feel will be?


I want to make it very unisex so I am going to have a woodsy and very neutral color scheme with some girly accessories for miss June while she's in there;)


I made this using this tutorial and inspiration from this fantastic mobile here.


Pretty cute, huh?  I think so, and so does June;)